AngularJS 1.4.1
TypeScript 1.5
Page routing helps to create a clear structure when you need to assiociate views with controllers.
If you are just using angularJS.core you need to add angularJS.route to your project with nuget packages manager.
You can start this tutorial after AngularJS and TypeScript part 2. We are going to add 2 new pages with 2 controllers and keep the MainController for the navigation.
Controllers
Create a Common.ts file inside the controller folder. This file will be used for cross controllers elements.
Create a new interface inside like below, this interface will be a base for the scope of the page controllers . You can add in this interface all your properties and functions to share between your scopes.
module Controller {

export interface IPageControllerScope extends ng.IScope {

//For now we just have a title
title: string;

}

}
Inside the helper folder create a PageHelper class. This class centralize the URLs for the pages.
module Helper {

 export class PageHelper {

 public static MainPageUrl: string = "/";
 public static ImagePageUrl: string = "/Image";
 }

}
Create 2 controllers inside the controller folder:
- MainPageController
- ImagePageController
MainPageController:
module Controller {

export interface IMainPageScope extends IPageControllerScope {

}

export class MainPageController {

constructor(private $scope: IMainPageScope) {

$scope.title = "Main Page";

}

}

}
ImagePageController:
Move the code from MainController to ImagePageController.
module Controller {

 export interface IMainPageScope extends IPageControllerScope {
 lat: Number;
 lon: Number;
 date: Date;
 GetImage: Function;

 ImageResult: Model.NASAImage;

 }

 export class ImagePageController {

 constructor(private $scope: IMainPageScope, private NASAService: Service.NASAService) {

 $scope.title = "Image Page";

 $scope.lat = 1.5;
 $scope.lon = 100.75;

 $scope.GetImage = () => {

 NASAService.GetImage($scope.lat, $scope.lon, $scope.date).then(function (result: Service.ImageResult) {

 $scope.ImageResult = result.data;
 },
 function (error) {

 });

 };

 }

 }

}
MainController:
Modify the MainController, add 2 functions to navigate and 1 method to modify the page url:
module Controller {

 export interface MainControllerScope extends ng.IScope {
 showMainPage: Function;
 showImagePage: Function;
 }

 export class MainController {


 constructor(private $scope: MainControllerScope) {

//Function to navigate to the MainPage
 $scope.showMainPage = () => {
 this.goToPage(Helper.PageHelper.MainPageUrl);
 };

//Function to navigate to the ImagePage
 $scope.showImagePage = () => {
 this.goToPage(Helper.PageHelper.ImagePageUrl);

 };

 }

//Function helper to change the page url
 goToPage = (pageUrl: string): void => {
 location.assign("#" + pageUrl);
 }


 }

}
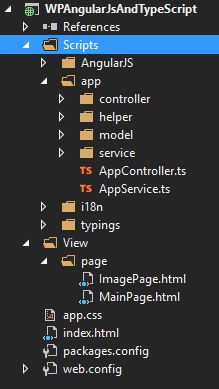
Views
Create a new folder View at the root of the project. And add a page folder inside.
Create 2 new html pages:
- ImagePage.html
- MainPage.html
MainPage:
<div>
<h1>{{title}}</h1>

<!-- Add your content here -->
</div>
ImagePage:
<div>
 <h1>{{title}}</h1>

 <p>Latitude:</p><input type="number" ng-model="lat" />
 <p>Longitude:</p><input type="number" ng-model="lon" />
 <p>Date:</p><input type="date" ng-model="date" />

 <input type="button" value="Get" ng-click="GetImage()" />
 </br>
 <img ng-src="{{ImageResult.url}}" />
 <p>{{ImageResult.id}} {{ImageResult.date}} {{ImageResult.cloud_score}} {{ImageResult.url}}</p>

</div>
Index:
Change the index like this:
<!DOCTYPE html>

<html lang="en">
<head>
 <meta charset="utf-8" />
 <title>TypeScript HTML App</title>

 <!-- CSS -->
 <link rel="stylesheet" href="app.css" type="text/css" />

 <!-- Scripts -->
 <script src="Scripts/AngularJS/angular.js"></script>
 <script src="Scripts/AngularJS/angular-route.js"></script>

 <!-- Helper -->
 <script src="Scripts/app/helper/PageHelper.js"></script>

 <!-- Controllers -->
 <script src="Scripts/app/controller/Common.js"></script>
 <script src="Scripts/app/controller/MainController.js"></script>
 <script src="Scripts/app/controller/ImagePageController.js"></script>
 <script src="Scripts/app/controller/MainPageController.js"></script>

 <!-- Services -->
 <script src="Scripts/app/service/NASAService.js"></script>

 <!-- App Service -->
 <script src="Scripts/app/AppService.js"></script>

 <!-- App Controller -->
 <script src="Scripts/app/AppController.js"></script>

</head>
<body ng-app="App" ng-controller="MainController">
 <button ng-click="showMainPage()">Main Page</button> <!-- Shows the MainPage -->
 <button ng-click="showImagePage()">Image Page</button> <!-- Shows the ImagePage -->
 <ng-view></ng-view> <!-- This directive will render the html -->

</body>
</html>
Routing
Modify the AppController class:
module Controller {

 var app = angular.module("App", ["Service", "ngRoute"]);

 //Routing for the navigation between pages
 app.config(($routeProvider: ng.route.IRouteProvider) => {
 $routeProvider

 //Main Page Route
 .when(Helper.PageHelper.MainPageUrl, {
 templateUrl: 'view/page/MainPage.html',
 controller: 'MainPageController'
 })

 .when(Helper.PageHelper.ImagePageUrl, {
 templateUrl: 'view/page/ImagePage.html',
 controller: 'ImagePageController'
 })

 });

 //Controllers
 app.controller("MainController", MainController);
 app.controller("MainPageController", MainPageController);
 app.controller("ImagePageController", ImagePageController);

}
Now you should be able to navigate between pages. You can now add your own content to the pages and start creating some nice apps 🙂

This is a great example of how you might want to develop more modularity as your app begins to grow. Thanks for this, Cyril!
LikeLike